Cupcake Wrapper Tutorial


Readers - this tutorial has been a LONG time coming!  Ever since I posted about making my own cupcake wrappers (a long time ago, admittedly), I've received tons of questions about them.  Finally - some instructions and a template for all of you!!!  These wrappers can be time consuming to make, but can really go a long way to dress up your cupcakes.

Materials
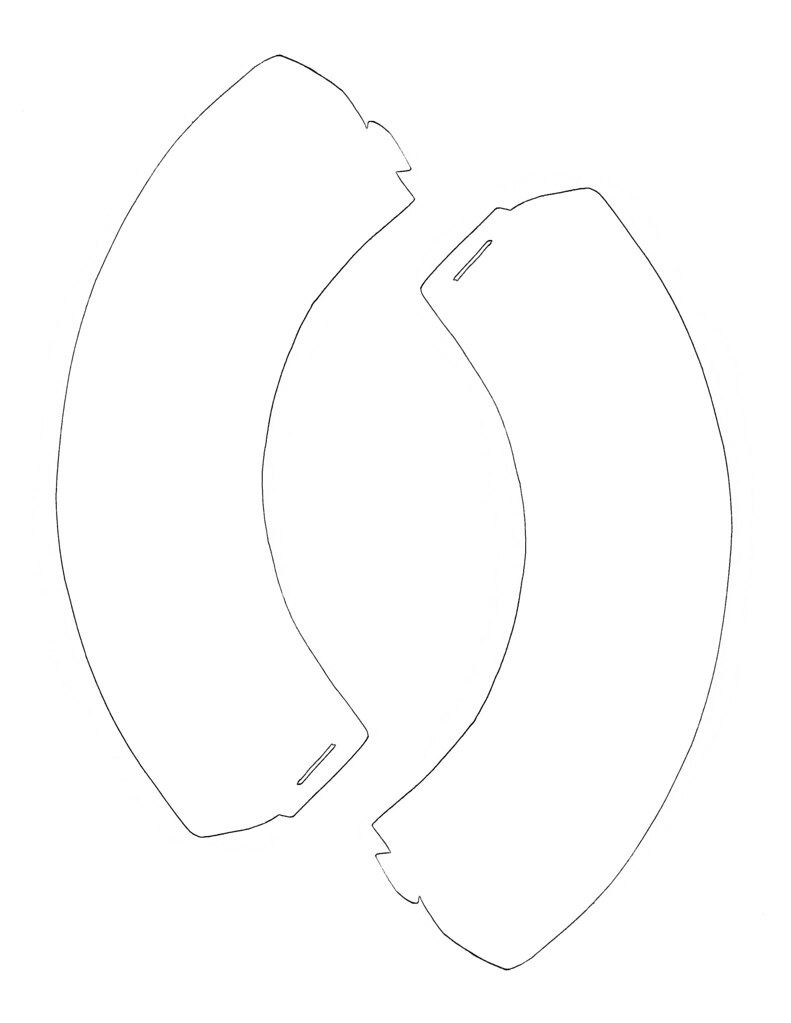
  • Wrapper Template - Download Here!  This template makes a wrapper that hooks together, and will hold all by itself (just like the laser cut wrappers).  No tape necessary!
  • Decorative Paper - really anything will do!  I've made wrappers out of scrapbook paper, decorative plastic sheets, and regular paper.  I prefer to use a heavier weight material (like scrapbook paper) - you'll want something that will hold its shape, and won't show grease through the paper if your cupcake or frosting touches it.
  • Scissors: for cutting out your wrappers, of course.  For those of you who have cutting machines (like the Craft Robo or Silhouette), you should be able to create cut files pretty easily from my template.
  • Exacto Knife - for cutting out the slot that the wrapper tab will fit into.
  • Fancy Design Scissors - you'll use these scissors to create decorative top edges for your wrappers.  These are totally optional.  I have tons of these scissors!  Fiskars makes decent ones, that aren't too expensive.
  • Other decorating materials / decorative elements:  you can get as creative as you like when it comes to decorating your wrappers!  I chose to embellish the wrappers you see in this post with tiny pinwheels, a flower I cut out of the paper I was using, and flat-back Swarovski crystals.   Just a few things you might consider using - rubber stamps and ink, paper punches (these come in pretty much any shape you can imagine!), pretty stickers, etc.  Use your imagination here!
Technique
  1. Download my handy template, and trace onto cardboard (I used part of a bakery box).  Cut the tab and slot carefully.
  2.  Trace template on the wrapper paper of your choosing with a pencil.  You'll want to erase any leftover marks after you cut out your wrappers.
  3. Cut out your wrappers, and again - cut the tab and slot carefully. 
  4. Hook the tab into the slot - and voila!  A cupcake wrapper!  You may need to adjust the size of the tab/slot to make them fit together.
  5. Cut the top of the wrapper with your decorative scissors, and embellish as you like.

A sweet way to say "See You Soon"


There's no other way to put this: it stinks when awesome co-workers leave!  My friend Wooju's last day was today, and in lieu of the traditional "good bye" card, I decided to make sugar cookies that everyone could decorate.  Seeing as these were going into work, I couldn't bring royal icing for people to decorate with (way too messy!) - so I brought in a rainbow of edible ink markers instead.  Everyone had so much fun decorating (and eating!) cookies, and Wooju was totally surprised.

Now, most of these are decorated with inside jokes and other geekiness (I am a software engineer, after all!).  But seriously - how awesome are they??

Yes, the bottom left is "good luck" in binary


Front and center, "good luck" in Korean


Wooju, we'll miss you!  Wishing you all the best - we can't wait to see you in Time Magazine!


Sugar Cookie Tutorial

These cookies would be super fun for a kids party, and are actually pretty easy to assemble.

Step 1: Bake sugar cookies!  I made fairly large and medium sized cookies, 2-4", but you can make any size you want.  I liked offering a few different sizes, so that people could really get creative.


Steps 2 & 3: Cover cookies with fondant, and pipe a decorative border with royal icing.  You definitely do not have to pipe a border; I did to make the cookies a little bit fancier.  You can also add sparkling/sanding sugar, sprinkles, non-pareils, etc to the borders if you like.  Let the fondant dry before decorating, preferably overnight.


Step 4: Decorate!  I love these Americolor Gourmet Writer Food Decorator Pens. They dry quickly, and write really nicely on fondant.


And that's it! Super simple to put together, with very little clean-up post-decorating.

Spring Macarons and a Ruffle Cake


We're just a few days away from spring - and it's finally feeling like winter is over here in the northeast (I hope I didn't just jinx it!).  I felt inspired this weekend to make some treats in pretty colors.

My first treat - french macarons.  The pink macarons are vanilla with vanilla cream filling; the yellow macarons are filled with an amazing marscarpone lemon cream filling.  I have to say - these are the best macarons I have made yet.  A wonderfully thin shell, soft, slightly chewy interior, and nice feet!  They were delicious right out of the oven - and even better after a day in the refrigerator.  Yum!


My second treat - a pink ruffle cake.  Seems like I've been seeing ruffle cakes everywhere lately, and decided I needed to make one myself! Pretty pink buttercream ruffles adorn a chocolate cake filled with cappuccino cream.


Happy (almost!) spring!

Please help: For Japan With Love


By now, we've all seen the horrific photos from Japan, and heard gut wrenching stories of pain, tragedy, and suffering.  In times like these, many of us so far away feel kind of helpless, and search for ways to get involved.

Through the blogging world, I discovered a way to immediately take action.  The amazing bloggers from Utterly Engaged and Ever Ours teamed up to create a fundraising page: For Japan With Love, and picked ShelterBox as the organization to donate to.  ShelterBox was one of the first organizations asked to help in Japan, and they need our help in order provide the best disaster relief possible.  Please help if you are able - every little bit counts!! 

The ShelterBox solution in disaster response is as simple as it is effective. 

We deliver the essentials a family needs to survive in the immediate aftermath of a disaster.

Each large, green ShelterBox is tailored to a disaster but typically contains a disaster relief tent for an extended family, blankets, water storage and purification equipment, cooking utensils, a stove, a basic tool kit, a children’s activity pack and other vital items. 

This Friday, along with many other bloggers, I will be participating in the "Bloggers Day of Silence" to raise awareness.  If you are a blogger, and would like to participate as well, just head over to Utterly Engaged or Ever Ours for the details.

Cupcake Decorating Tutorial


Have you ever looked into a cupcake display case in a shop, and taken a look at all the gorgeous swirls and artfully placed dollops of icing? Have you ever asked yourself, "I wonder how they do that??". Hold on to your piping bags people - you're about to learn (and it's not as hard as you might think)!

Materials
  • Piping bags - I prefer to use a larger piping bag (16"+) for icing cupcakes. You won't have to fill the bag as often, and your icing won't be close to the opening of the bag. If you're wondering what happens if you overfill a piping bag and squeeze - icing will ooze out the top of the bag, making it impossible to keep the outside of the bag clean (and therefore, it'll be difficult to hold onto!).  I like using reusable fabric bags better than plastic - they are easier to grip, and easier on the environment.
  • Extra large decorating tips - these are a must!  Bake it Pretty, and The Cupcake Social both have nice selections.  While you can use large tips from a decorating set, the extra large tips will give you the cupcake shop look.
  • Icing - use your favorite buttercream/cream cheese/etc recipe.  Keep in mind that decorating cupcakes requires a decent amount of buttercream - especially if you like large swirls like I do!  My recommendation is to make a little bit more than you think you need to start - once you decorate your first batch, you'll have a better idea about far your frosting will go.  A helpful tip: once your icing is whipped up, mix it on the lowest speed possible for about 5 minutes.   This will help to get rid of air bubbles in your icing, leaving you with super smooth icing that will help you achieve professional looking swirls! Here's a post with my favorite buttercream recipe: http://decoratethis.blogspot.com/2012/09/swiss-meringue-buttercream.html

Technique
Believe it or not, (almost) all of these cupcakes are decorated using the same piping technique!  I used the following 4 tips to decorate all of the cupcakes in this tutorial:


The open star tip is a Wilton 1M; the closed star, french, and plain round are extra large tips, and were purchased from The Cupcake Social.

Piping Technique for Extra Large Tips
  1. Place tip inside your piping bag, and fill with icing.
  2. Hold your piping tip approximately 1/4" above your cupcake at a 90° angle.  Pipe a spiral of icing, beginning at the outer edge of your cupcake and working inward and upward.  Stop pressure; pull tip straight up and away (complete the entire spiral before stopping pressure and pulling tip away).
  3. That's it!  Super simple, right?  Remember that practice makes perfect - sometimes I pipe several bad swirls before I get one that I actually like.  Keep in mind that you can vary the height of your icing.  I like super tall swirls, but you can easily make them shorter by finishing off your swirl after 1 or 2 trips around the cupcake.

Piping Technique for Large Tips
  1. Place tip inside your piping bag, and fill with icing.
  2. Hold your piping tip approximately 1/4" above your cupcake at a 90° angle.  Pipe one layer of icing around the entire area of the cupcake, beginning at the outer edge and ending in the middle.  Stop pressure, and pull tip away.
  3. Pipe a second, smaller spiral (not quite as wide), on top of your first layer of icing.  End your spiral at the center of the cupcake.  Stop pressure; pull tip straight up and away.

Here are a few mini cupcakes I decorated using the same tips, and just about the same techniques.  The heart sprinkle cupcake was decorated with the french tip, and I piped a single large star.  The remaining two cupcakes were decorated with a large plain round tip, and Wilton 1M respectively, using the instructions above for extra large tips.


Decorating Cupcakes
Ok - now that your cupcakes are decorated with beautiful swirls, now what?

There are truly endless possibilities when it comes to decorating!  This is where you can really get creative, use your imagination, match party decor - or just let the gorgeous swirls speak for themselves!  A few decorating ideas:
  • Sprinkles, coarse sugars, sanding sugars, quins, nonpareils, sugar pearls: there are TONS of options here, available in pretty much any shape, size, color or holiday theme that you can imagine!  A few of my favorite sources: The Cupcake Social, Bake It Pretty, Fancy Flours, Global Sugar Art.


  • Fondant toppers - remember those days back in elementary school, where you got to make cool things out of clay?  Channel your inner grade-schooler and grab some fondant!  If you can mold or cut basic shapes - you can make great fondant toppers.  I made these super cute owls and modern flowers with just a few circle cutters, some flat-back swarovski crystals, and a little bit of patience :)  There is also a pretty nice selection of handmade toppers on etsy.com.


  • Non-edible toppers - thanks to the cupcake craze, there is an extensive selection of themed decorating sets out there.  Take a look at your favorite craft or kitchen specialty store for cute sets.  There are also tons of crafty people out there selling handmade items and printables on Etsy.  If you're feeling crafty, you can go the DIY route (my favorite, being the arts and crafts lover that I am).  Here are a few easy tutorials (that require just a few tools/materials!) that I love: Fabric Flower Cupcake Toppers, Paper Pinwheel Cupcake Toppers, Birthday Cupcake Toppers.


I hope that this was helpful - if you have any questions or comments, please let me know!  Now, go make some gorgeous cupcakes! :)

Ice Cream Sundae Cupcakes


Inspired by a friend at work, I made these super cute ice cream sundae cupcakes. Chocolate cupcakes covered with fondant, with chocolate ganache "fudge", vanilla buttercream "whipped cream", and a perfect fondant cherry on top!


Spring, please get here soon!

Pretty pink vanilla bean macarons

Thankfully, spring is on the way! Today ended up pretty chilly, but things are looking promising for the week ahead.  Just a few pastels and brights to share with you today, to remind all of us who have been cold for several months that we've all almost made it through another winter.


Strawberries & cream bridal shower cake,
with a dinner plate dahlia from my garden!

Bright, happy, and a little bit sparkly -
gerber daisies on top of white velvet cupcakes

A Pretty Little Wedding Cake


A pretty little wedding cake that I made for one of my sister's friends!  The cake is carrot (yum!), and the rose ribbon and flowers match the bride's dress.  Best wishes for a lifetime filled with love, laughter and joy to the happy couple!


Wedding Cupcake Tasting


I made a variety of cupcakes this weekend for a wedding (cup)cake tasting, and another mini cake for my wonderful co-workers!

You'll notice that I used a variety of piping techniques for the buttercream - stay tuned for another tutorial!  It's actually surprisingly easy to make really wonderful looking cupcakes with the help of just a few extra large piping tips.  A question for all of my readers: what kinds of tutorials would be most helpful to you?  Please leave me a comment!


And, a pretty little carrot cake I made for my co-workers (can you tell that I'm loving amenone flowers lately??)