Andrea's Housewarming!
As promised last weekend - here are some more party details!
My best friend Andrea just moved into an *amazing* new apartment, and of course we had to celebrate! And what better way to do so than with a dessert party?
Andrea has a black, white, and red theme to her decor, so we decided that we would do the same for the dessert table. The sweets included: chocolate cake with chocolate ganache filling, chocolate macarons, coconut mini cupcakes, and chocolate and vanilla cake pops, dipped in white and milk chocolate. I added red and white rock candy, and candy sixlets for a little bit of extra flair.
The party was a huge hit, and Andrea- I am so glad that you are so happy in your new home!
Gray and Pink Cupcake Cookies
Piping is one of the skills I am striving to improve this year. For someone like me who looooovvesss to drink (lots!) of coffee - I can easily down a pot in a morning! - my hands can be on the shaky side. So last night, I put down the caffeinated beverages, and made these pretty gray and pink cupcake cookies to practice.
Some helpful tips to keep in mind when decorating cookies with royal icing:
- Set aside plenty of time for decorating/experimenting - it's best to practice your skills when you're not feeling rushed.
- When coloring your icing, make sure that it is completely mixed in (unless you are going for a streaky look).
- To help avoid problems with bubbles in your flooding icing, let the thinned icing sit (covered with a wet paper towel or saran) for at least 15 minutes. This will allow bubbles to come to the surface, and you can break them up by stirring gently. This is well worth the wait - I am seriously OCD when it comes to bubbles in my icing, and I'll obsessively pop any bubbles that come to the surface of my cookies. I usually try to thin my icing for flooding right after I color it, so it has enough time to sit. Just make sure that you save enough for piping - you can always thin more!
- Work with a small amount of icing in your piping bag at a time. It'll be much easier on your hands, and will allow you more control.
- Make sure that your piping hand/arm is well supported, and that you are sitting in a comfortable place with plenty of working space.
- Make sure that your icing is the right consistency for what you are trying to do. You'll have problems if the icing you are trying to flood with is too thick, just like you'll have problems if the icing you are trying to outline with is too thin.
- When piping, hold the tip a few millimeters away from the cookie's surface. Too much - and you risk the "squiggles". Too little - you'll squish your lines.
- Give your cookies enough time to dry, preferably over night. You don't want to stack or package them until the icing is dry.
- And remember: your cookies did not come out of a factory! We all strive to create things that we're proud of - but please try to remember that you are only human, and your cookies should not look like they were made by a machine. You are creating art - delicious, delicious art!
Party Preview!
My dear friend Andrea just moved into a new apartment - what better way to celebrate than with lots of sweet treats?
I have a ton of pictures to comb through, but thought I would give you all a quick preview :)
I have a ton of pictures to comb through, but thought I would give you all a quick preview :)
Happy Valentine's Day!
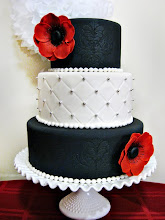
A romantic little cake for Valentine's Day, adorned with a red gumpaste anemone flower. Sorry for the shadows in the first picture, but I just had to show off my new Fenton hobnail stand (I am totally obsessed with it!!)
A sweet way to say "Thank You!"
Winter in the Northeast this year has been rough. We've had at least 1 or 2 significant snowstorms each week for the past several weeks, and at this point, we're only about 30" away from setting a new all-time record. For those of you who haven't seen the Shaq-o-meter - be prepared to laugh, cry, or be thankful that you live somewhere with much less snow!
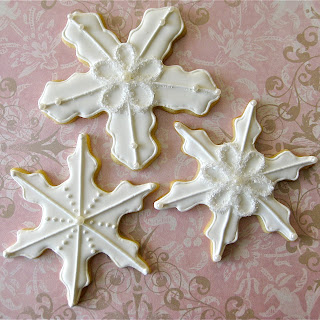
My mom works in home care, and the nurses she oversees must visit elderly or otherwise ill patients regardless of the weather. She wanted to thank some of her co-workers for really stepping up the past few weeks, and asked me if I would create some snowflake cookies to say "thank you". Iced with royal icing, and decorated with sparkling sugar and sugar pearls, these jewel toned beauties are sure to make anyone's day!
Cake Pops - A Tutorial
Cake pops are one of my favorite miniature treats. A few bites of cake, coated in chocolate, on a stick - super cute, delicious, and fairly easy to make.
Materials:
- Cake: any of your favorite recipes should work - though I will caution you, super oily cakes may be problematic - read, the oil may escape the chocolate/crack the chocolate, etc. I prefer using butter cakes for cake pops, or I'll cut down on the amount of oil in an oil-based recipe.
- Buttercream (or cream cheese icing, chocolate ganache, etc): keep in mind that frostings with perishable ingredients will need to be refrigerated. I've never had problems refrigerating cake pops.
- Chocolate: I love Chocoley chocolate. It tastes a million times better than candy melts. I use the dipping and enrobing formula for cake pops. Chocoley sells special candy coloring for chocolate as well, so you can get as fancy as you like with colors!
- Lollipop sticks
- Baking sheet, lined with parchment or a silicone mat
- Styrofoam block, or anything with lollipop stick sized holes in it. Be careful not to poke ALL the way through your styrofoam block; you want the stick to be able to stand up right, but not be so deep that the cake is too close to the styrofoam (it'll be really hard to place without disturbing wet chocolate).
- A small, deep, microwave-safe bowl. You need to be able to stick a cake pop into the chocolate straight and have it all be covered. Things turn into a mess quickly when you don't have enough chocolate in the bowl, and you need to tip it in order to cover your cake pop.
- Crumble your cake into uniform crumbs. A food processor can be helpful here, but it's pretty easy to use your hands as well.
- Mix in enough frosting so that the cake holds together when squeezed. You should be able to roll a firm ball that holds its shape. I tend to add a different amount of frosting depending on what recipe I use; add slowly and test the consistency frequently.
- Refrigerate the cake balls until firm, or place in freezer. A word of caution - you do NOT want to dip frozen cake balls into chocolate! The cake will expand as it defrosts, and it will crack the chocolate coating. Firm is ok - frozen is not. If you are having problems with cracking cake pops - they are likely too cold and/or your chocolate too hot.
- Melt a small amount of chocolate, and dip a lollipop stick in about 1/2". Stick at least half-way into cake ball (make sure you don't poke all the way through!). Repeat with remaining cake balls.
- Refrigerate until chocolate is firm around the lollipop stick.
- Melt chocolate in your microwave safe bowl, according to package instructions. Make sure that you melt enough chocolate so that you can submerge the entire cake pop without tilting the bowl, and without hitting the bottom.
- Dip cake pop into chocolate, so that it is completely submerged (make sure to cover the chocolate around the lollipop stick!). It's really important that the entire cake ball is covered with chocolate - otherwise, the cake will escape from any and every tiny hole in the chocolate (trust me, it's not pretty).
- Once cake pop is completely covered, lift it out of the chocolate.
- Once removed from the chocolate, excess coating will start dripping off of the pop. Hold the cake pop in one hand, and gently tap your hand to help remove excess coating, turning the pop as you go so the excess will come off evenly.
- When you have no drips left, hold cake pop upside down for a few seconds to allow coating to dry a bit before inverting. If you are going to dip your pops twice, dip it again now. I do like to dip twice when using the Chocoley dipping and enrobing chocolate. If you are adding sprinkles, sanding sugar, or other decorations, wait until the cake pop is about halfway dry before you start. If the coating is still too wet, the weight of the sprinkles or other decorations may displace the chocolate.
- Invert cake pop, and place in your stand to dry completely. Enjoy!!

Happy Birthday!
Subscribe to:
Posts (Atom)


